The below article was written by Paul Holloway of Holloway NDT.
Introduction
The ASME rules for choosing the right piping calibration block are written fairly straightforward but can easily be misinterpreted if you don’t keep your math-y bits in check. Let’s take a look at the rules to find a way to take the confusion out of it and avoid any embarrassing mishaps. Your auditor and Level 3 won’t have anything to do (and that’s the way they like it!)
There are only two things you have to figure out: curvature and thickness.
The Rules “Around” Curvature*
*as a Dad I am allowed, no… obligated to make bad puns
The following rules are summarized from ASME Section V (2019) Article 4 para. T-434.1.7:
Curvature Rule #1: If the pipe diameter is greater than 20 inches, use a flat block. If it’s 20 inches or less, use a curved block.
Curvature Rule #2: If you need a curved block, take your calibration block diameter and multiply it by 0.9 to 1.5. This is the range of pipe diameters that the block is good for.
Example: A calibration block with a diameter of exactly 10 inches has a usable range of 9 to 15 inches, meaning you could use it for 10, 12 and 14-inch pipe inspections. Unfortunately, 8-inch and 16-inch are outside this range.
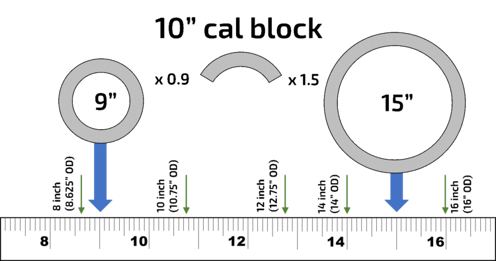
Figure 1: "What diameters of pipe can I use this calibration block for?”
Note: This example is set up to make the math really easy; it’s not likely you’re going to have a cal block exactly 10-inches in diameter unless you get something machined down. A 10-inch pipe is actually 10.75-inches outside diameter. Pipe sizes are weird like that until you get to 14-inches and over.
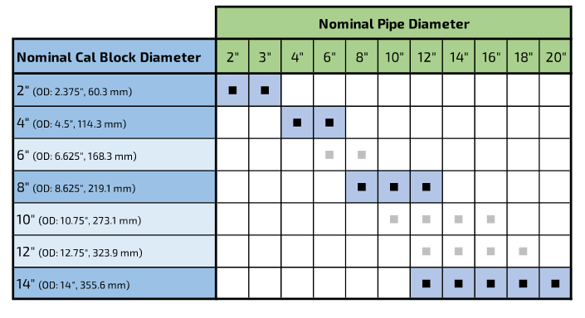
To cover pipe from 2 to 20 inches, you need only 4 different diameters of calibration blocks:
But remember, this is curvature or diameter only. We still need a variety of thicknesses in each one of these sizes to cover off a good portion of the schedule chart. Which brings us to our next section…
The Skinny About Thickness
The following is from ASME Section V (2019) Article 4 para. T-434.3:
Thickness Rule: The calibration block thickness has to be within 25% of the pipe thickness
That’s pretty simple, you just have to remember to multiply the pipe thickness by 0.75 (down 25%) or 1.25 (up 25%).
Note: Careful with that math, Eugene! Don’t divide the pipe thickness by 1.25 to find the lower limit on calibration block thickness. Dividing by 1.25 is not the same as multiplying by 0.75.
Now, notice anything different about the rules for curvature and thickness?
The rule for thickness is based on the pipe, but curvature was based on the calibration block.
Curvature is: “I have a calibration block, what range of pipe is it good for?”
Thickness is: “I have a pipe, what thickness of calibration block do I need?”
Argh! Why did they do this? The fact that the rules for curvature and thickness are written in opposite directions can easily lead to confusion. But fear not, because the following illustrations (and built-in examples) will help you whichever direction you choose to look at it:
This is the way it’s written in the code (multiply the pipe thickness ±25%):
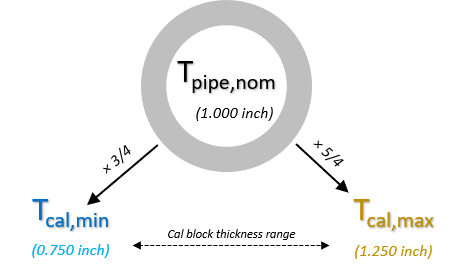
Figure 2: Pipe thickness (±25%) to find suitable calibration block thickness
And this is the way you’d look at it if you want everything in terms of the calibration block:
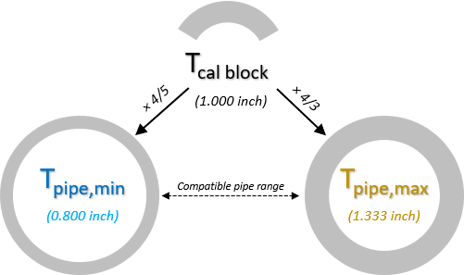
Figure 3: Cal block thickness (80% to 133%) to find applicable pipe thickness
Note: Fun math fact, the numbers you multiply by in Figure 3 are the reciprocals (upside down versions) of the ones in Figure 2.
A Word of Caution
Be aware of wedge curvature: you cannot use an undersized wedge. This is a code rule. Even though a 14 inch piping calibration block can technically be applied to 12 inch pipe, you can’t use your AOD12.75 wedge on the 14 inch block to calibrate. Plan ahead. If you’re using a block along the lower end of the range, make sure to use a wedge that at least meets the block requirements. A slight oversize on wedge curvature is allowed (see T-432.2), but never undersize.
Conclusion
There are many considerations to make when choosing an appropriate piping calibration block. Of course, an exact match is always the best. But it would be impractical to carry around a sample of every diameter and thickness of pipe in the schedule chart, so the ASME code gives us some flexibility. But it wasn’t always this way… as recently as 2007 we didn’t have the 0.9 to 1.5 allowance on curvature or the ±25% on thickness: your calibration block had to match both the diameter and thickness of the pipe. That’s a lot of calibration blocks in the back of the pickup truck!
Acknowledgements
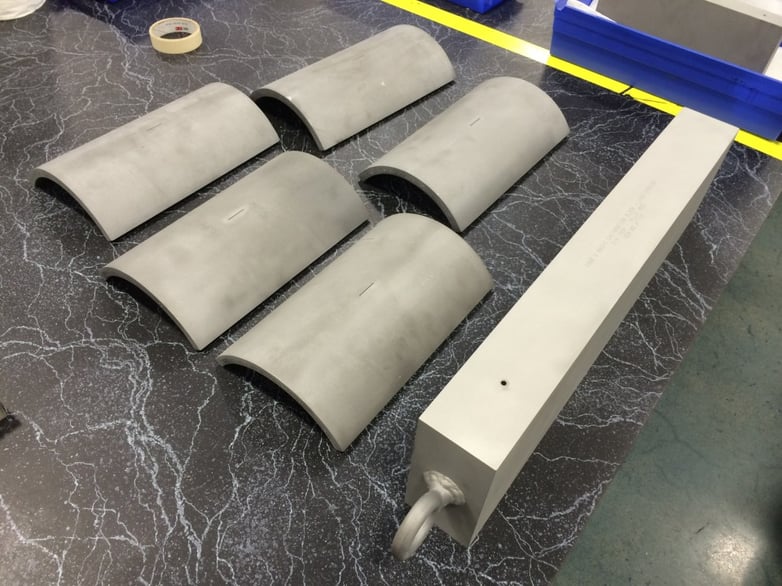
Thanks to Andrew Robinson at PH Tool for the picture of the calibration blocks at the top of the article, and to Ed Ginzel for proofreading.
Thanks, Paul, for allowing us to share this article!